
Your factory LM7 alternator system runs multiple wires to different components, making it unnecessarily complex. A 1-wire alternator system upgrade provides a simpler and quicker way to change your vehicle’s electrical setup.
The 5.3L V8 LM7 engine’s 1999 introduction brought this upgrade option that needs just one battery connection. This design reduces wiring clutter and prevents potential electrical failures. You’ll need $200 to $400 for a system that consistently delivers 13.8 to 14.5 volts – exactly what you need to charge 12V batteries without complex wiring hassles.
This piece covers everything about upgrading your LM7 to a 1-wire alternator system. We’ll show you the essential pre-checks, installation steps, and ways to avoid common mistakes.
Understanding LM7 1 Cable Alternator Basics
The one-wire alternator system transforms your LM7 engine’s charging system operation. GM first engineered this innovative design for industrial equipment. Today, it serves automotive applications and offers an optimized approach to power management.
This single-wire alternator comes with an internal voltage regulator that controls output by itself. Traditional alternators need separate field excitation wires, but this system activates on its own once the engine hits operational RPM. You won’t find external voltage regulators like those in charging systems through the 1970s.
A simple principle drives the system’s operation. A single wire runs from the alternator’s charging stud straight to the battery’s positive terminal. You can also route this connection through a positive terminal junction or starter solenoid. The internal regulator keeps voltage levels steady and ensures the best battery charging without extra control circuits.
The RPM threshold matters significantly. Your alternator starts charging at 1200-1400 RPM. Vehicles with carbureted engines that have high-idle cold start settings begin charging right away. All the same, if your cold start idle drops below this threshold, you might need to adjust the throttle quickly to start charging.
Your alternator’s performance depends heavily on the pulley ratio. Most alternators work best with a 3:1 pulley ratio – what factories typically use. Making changes to slow down the alternator can stop proper charging and might cause low voltage problems at idle.
Experts suggest picking an alternator rated 20-25% above your total electrical load. To name just one example, see a vehicle that draws 97 amps – a 140-amp alternator gives enough extra capacity without risking damage to the system.
This upgrade does more than just simplify wiring. It delivers:
- Higher charging output for power-hungry accessories
- Reduced potential failure points
- Cleaner engine bay aesthetics
- Better compatibility with aftermarket components
Essential Pre-Upgrade Checks
The LM7 1-cable alternator upgrade needs proper preparation to make installation easier. Your safety matters most – always disconnect the negative battery terminal before any electrical work. Make sure you have good ventilation in your workspace and wear proper safety gear like approved safety glasses, goggles, or face shields.
You’ll need these tools to get started:
- Socket and ratchet set
- Wire cutters and crimpers
- Voltage tester/multimeter
- Memory saver device
- Belt tensioner tool
Make sure your chosen alternator matches your LM7’s specs. You can pick between the compact 105-amp alternator or go with the beefier 145/160-amp versions. Take time to think about your vehicle’s electrical needs – experts recommend an alternator rated 20-25% above your total electrical load.
The right wire size is vital for safety and performance. Wires that are too small can overheat, melt insulation, or even cause electrical fires. Your wire gauge must handle your alternator’s maximum output to stay safe.
NHRA competition vehicles need specific safety features:
- Two 3/8-inch-diameter bolts to mount the battery securely
- Metal straps to hold the battery down
- Batteries must weigh no more than 150 pounds combined
- You’ll need a master cutoff switch if you move the batteries
Look over all your electrical parts before you start. Check any aftermarket accessories on battery terminals and test other electrical systems. Your battery should be fully charged and tested to work its best.
Watch out for paint or clear-coat on mounting surfaces. These can block proper grounding and cause charging problems. Some alternators come with grounding tabs that will give you reliable operation.
Boats and wet environments need extra protection against corrosion. Regular checks and proper lubrication will help parts last longer despite engine vibration. These steps will extend your charging system’s life by a lot.
Step-by-Step Installation Guide
You have gathered all necessary tools and completed pre-installation checks. Let’s head over to the step-by-step process of installing your 1-cable alternator. Your vehicle should be parked on a level surface with the engine off for safety.
Step 1: Battery Disconnection and Original Setup The negative battery cable needs disconnection first. Move it to a safe location. Remove the engine cover and air cleaner outlet duct to access the alternator assembly better.
Step 2: Serpentine Belt Removal A breaker bar with the appropriate hex-head socket helps rotate the drive belt tensioner clockwise to relieve tension. The belt can be carefully removed from all pulleys once loosened. This provides a good chance to check the belt surfaces for wear or damage.
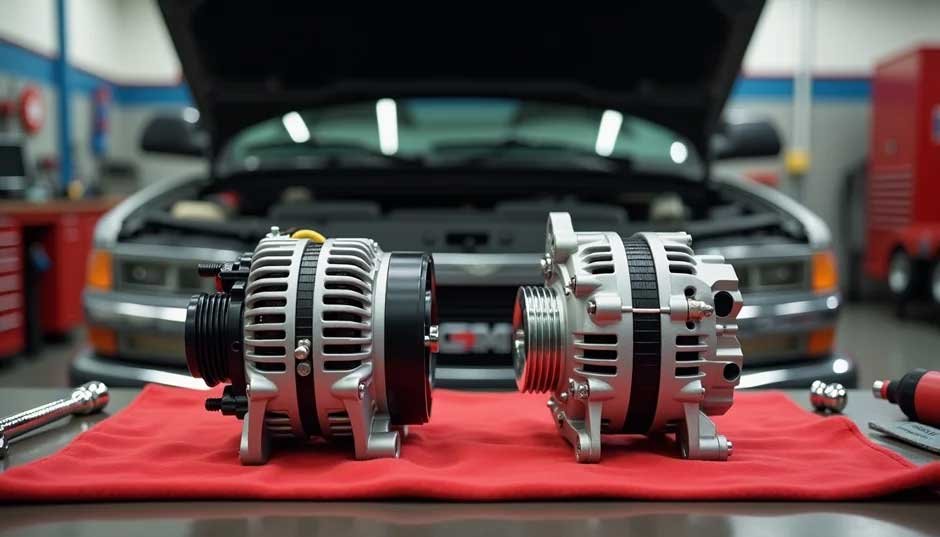
Step 3: Removing Original Alternator
- Press the tab and pull straight out to disconnect the wiring harness plug
- Remove the protective boot to access the terminal stud
- Remove the terminal nut to disconnect the battery output cable
- Remove mounting bolts (typically two) that secure the alternator
Step 4: New Alternator Installation The new alternator should be positioned carefully to arrange it with existing mounting brackets. The original mounting bolts secure it with 37 foot-pounds of torque. The single power cable connects directly to the battery’s positive terminal.
Step 5: Belt Reinstallation and Final Connections The serpentine belt routes around all but one of these pulleys – the idler pulley. The breaker bar rotates the tensioner again so you can slip the belt under the final pulley. The belt should have 1/2″ to 3/4″ play under light pressure after installation to verify proper alignment and tension.
Step 6: Testing and Verification The engine can be started after battery reconnection. A voltmeter helps verify charging output. The proper readings should show between 13.8 and 14.5 volts at 1,000 RPM. The system needs monitoring during initial operation to ensure correct function.
Conclusion
A 1-wire alternator system upgrade for your LM7 makes a smart investment. This simple modification creates a cleaner wiring setup and delivers consistent charging performance. Vehicle owners will see better engine bay aesthetics and steady voltage output right away.
The system’s success relies on proper preparation and precise installation steps. Taking safety precautions and running comprehensive pre-checks will help you avoid common issues. The right alternator capacity should exceed your total electrical needs by 20-25% to achieve optimal performance.
Your new setup needs thorough testing after installation. The voltage should stay steady between 13.8 and 14.5 volts at normal operating RPMs. This upgrade might look challenging initially, but a step-by-step approach will give lasting results. Your charging system’s reliability will last many years with regular maintenance checks.
FAQs
Q1. What are the main benefits of upgrading to a 1-cable alternator for an LM7 engine? The main benefits include simplified wiring, reduced potential failure points, higher charging output for power-hungry accessories, cleaner engine bay aesthetics, and enhanced compatibility with aftermarket components.
Q2. How do I choose the right alternator capacity for my LM7 1-cable upgrade? Experts recommend selecting an alternator rated 20-25% above your total electrical load. For example, if your vehicle’s components draw 97 amps collectively, a 140-amp alternator would be suitable.
Q3. What tools are essential for installing a 1-cable alternator on an LM7 engine? Essential tools include a socket and ratchet set, wire cutters and crimpers, voltage tester/multimeter, memory saver device, and a belt tensioner tool.
Q4. At what RPM does a 1-cable alternator typically begin charging? A 1-cable alternator usually starts charging at 1200-1400 RPM. For vehicles with lower cold start idle, a quick throttle adjustment might be necessary to activate charging.
Q5. How can I verify if my new 1-cable alternator is working correctly after installation? After installation, start the engine and use a voltmeter to check the charging output. Proper readings should be between 13.8 and 14.5 volts at 1,000 RPM. Monitor the system during initial operation to ensure everything functions correctly.